Pokémon Go has taken the world by storm in just one week. It is the World’s hottest mobile games right now. Pokémon Go is a free location-based augmented reality mobile game developed by Niantic. It was initially released in July 2016 for iOS and Android devices, starting with Australia, the United States, and parts of Europe, with Asian and other European releases to follow. Want to know how it works? Need a few tips and guides on How To Play Pokémon Go and become a Pokémon master? Read on.
Upon 24 hours after its release, Pokémon Go has become the fastest game to top the App Store and the Google Play, beating Clash Royale. As of July 11, 2016, Pokémon Go has an estimated 7.5 million downloads in the United States alone.
What is Pokémon Go and How It Works?
Pokémon Go is a new mobile game from the Pokémon universe developed for Android and iOS devices. It is based around Pokémon fundamentals of finding, catching, evolving, training and battling Pokémon. It happens right on your smartphone and in the real world around you, so you need to go out, search and find Pokémon in real places, rather than just in a game world.
Pokémon Go allows players to capture, battle, and train virtual Pokémon who appear throughout the real world. It makes use of GPS and Augmented reality (AR) the phone camera. Augmented reality (AR) is when what you see in the real world is changed by technology. In this case, it uses the camera on the rear of your smartphone and places the characters from the game for you to see on your display, blending the real world and the game world. This is one of the reasons it’s so exciting.
AR brings the game to life and you’ll find Pokémon down your street, at your local park and so on. That means that the Pokémon appear in real places, rather than a made-up world. Although the game is free-to-play, it supports in-app purchases of additional gameplay items. An optional companion Bluetooth wearable device, the Pokémon Go Plus, is planned for future release and will alert users when Pokémon are nearby.
The user becomes a Pokemon Trainer and can catch these monsters by using Poke Balls. Like in the anime and other games, you can train these pocket monsters to grow stronger and evolve. The fun part is that the game reacts to the environment around you. As players travel the real world, the avatar moves along the game’s map.
Different Pokémon live in different areas of the world; for example, Water-type Pokémon is generally found near water. When a player encounters a Pokémon, they may view it either in augmented reality mode or with a pre-rendered background. Players can also take pictures, using an in-game camera, of the Pokémon that they encounter both with and without the AR mode activated.
Unlike other Pokémon series, players in Pokémon Go do not battle wild Pokémon to capture them. In Pokémon Go, the game relies on a unique capture system where the player must throw a Poké Ball with the right force and at the right time to make a successful catch. After capturing a wild Pokémon, the player is awarded two types of in-game currencies: candies and stardust.
The candies awarded by a successful catch depends on what evolutionary chain a Pokémon belongs to. A player can use stardust and candies to raise a Pokémon’s “combat power” (CP). However, only candies are needed to evolve a Pokémon.
The player can also transfer the Pokémon back to the Pokémon professor to earn one more candy and create room for more Pokémon.
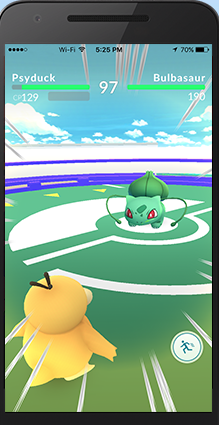
Players can also earn experience points for various in-game activities. Players rise in level as they earn experience points. At level five, the player will be able to battle at a Pokémon gym and join one of three teams (red for Team Valor, which uses Moltres as their mascot; blue for Team Mystic, which uses Articuno as their mascot; or yellow for Team Instinct, which uses Zapdos as their mascot) which act as larger factions within the Pokémon Go world.
If a player enters a Pokémon gym that is controlled by a player that is not part of their team, they can challenge the leader to lower the gym’s “prestige”. Once the prestige of a gym is lowered to zero then the player will take control of the gym and is able to deposit one Pokémon to defend it.
All Pokémon are displayed with a combat power. A Pokémon’s combat power is a rough measure of how powerful that pokemon is in battle. Not all Pokémon of the same species will have the same CP. Generally, as a player levels up they will catch Pokémon with higher CP. You can also interact with PokeStops and Gyms, which we will explain in detail below. And of course, you can battle other players, which is probably the most fun part of the game.

How To Play Pokémon Go
Now, let’s get to the main purpose of this post, which is on How To Play Pokémon Go. Want to learn the ins and outs of the game? Keep reading and we will explain how everything works!
Download Pokémon Go
First things first, you’ll need the Pokémon Go app which is available for iOS and Android devices. Currently, it is available only in the United States, Australia, and New Zealand. If you’re not in those areas, don’t there is a way to get Pokémon Go before it is released in your region.
As stated before Pokémon Go has only officially released in the US, Australia, and New Zealand if you are cover by these areas Pokémon Go is available as an app to download for Android and iOS.
Download Pokémon Go for iOS
Download Pokémon Go for Android
If Pokémon Go is not yet available in your country, Download Pokémon Go from the below links.
Download Pokémon Go for regions that are not covered yet.
If you are on Android allow your device to install and run apps downloaded from other places. Be cautious when you turn on this setting, as you’ll want to make sure you only download apps you know are safe and reliable. Open up Settings and go to Security. Scroll down and next to where it says ‘Unknown sources’, tap the toggle to turn this setting on.
For iOS, you’ll need to make your iPhone believe you’re in a region that can download Pokémon Go. Open up Settings on your iPhone, tap on ‘Apple ID’ and select to sign out. Now go back into Settings and select General > Language & Region. Set your region as US, New Zealand or Australia – all of these regions can download Pokémon Go. Now open up the App Store. Search for Pokémon Go and it should appear.</ br>
How to sign up for Pokémon Go?
After successfully installing Pokémon Go on your device, you will need to sign up for the game, here enter your date of birth and you will be presented with a couple of ways of signing up; through Google or the game’s own Pokemon Trainer Club system.
After signing up and logging into the app for the first time, you will need to create your avatar. Choose your method and get started creating your character. You can customize your digital avatar and choose the avatar’s style like hair, skin, and eye color, and can choose from a limited number of outfits. Once your avatar is finished, go on to choose your starter Pokemon. You can pick between the classics: Bulbasaur, Charmander, and Squirtle.
After your avatar is created, it is displayed at the player’s current location along with a map of the player’s immediate surroundings. Features on the map may include a number of PokéStops and Pokémon gyms. These are typically located at popular meeting places, such as memorials, places of worship, parks, and tourist attractions.
Using The Pokémon GO Map
Essentially, the main area of the game is a brightly-animated version of Google Maps. You’ll see roads, rustling grass, marking Pokémon in the area, and local landmarks disguised as PokéStops and Pokémon Gyms. As you move in the real world, your avatar does too. Pokémon will pop up on the map with a small vibration as you walk along, and if you tap on them, you can try to capture them.
The map is your main view while playing Pokémon GO, and it is based on the actual real-world map of the streets and pathways where you’re standing. The map contains lots of information that’s useful when you’re exploring. You’ll always be in the center of the map. Use it to find PokéStops, Gyms, the location of nearby Pokémon, and more. PokéStops usually exist at easily identifiable landmarks, such as public art installations or other points of interest.
The Map View displays the locations of Pokémon, PokéStops, and Gyms in the real world. Here’s what you need to know;
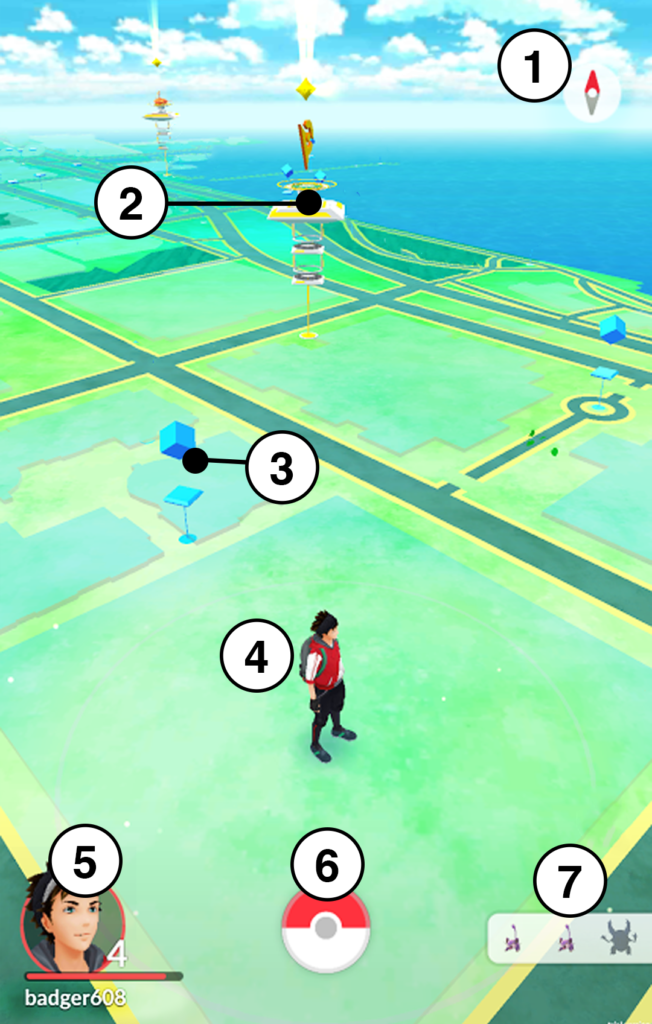
1. Compass: Toggles the viewing direction in Map View. You can switch between a north-viewing direction and auto-rotation, which follows your viewing direction. You can also rotate using touch gestures.
2. Gyms: It indicates the location where teams train and battle Pokémon.
3. PokéStops: Locations where Trainers can acquire items such as Poké Balls, Potions, and/or Eggs.
4. Trainer: Your avatar. That’s you.
5. Profile Icon: It shows your progress and achievements.
6. Main Menu: To access settings, items, your Pokédex, the shop, and Pokémon menu options.
7. Nearby Pokémon: It displays wild Pokémon located nearby.
How to Catch Pokémon
Catching Pokemon is the main thing you’ll be doing in this game. After the initial set up is done, the app will use GPS data to pinpoint your location in what looks like a customized version of Google Maps. A ring will appear around your character, showcasing your range. Your device will vibrate to alert you when a wild Pokémon is nearby. If you don’t see any Pokémon nearby, take a walk! Pokémon love places like parks, so try visiting a local recreational area. You can attract more Pokémon to your location by using an item known as Incense.
Some wild Pokémon appear only in certain environments and climates. For example, some Pokémon may appear only near lakes, oceans, or other bodies of water.
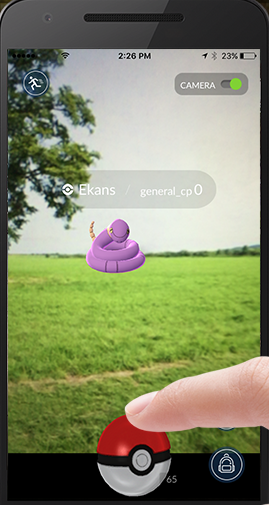
When you’re in a position to catch a Pokémon, the screen will switch to a first-person view with the Pokémon in front of you. Use your touch screen to throw Poké Balls to try to catch the Pokémon. Careful—Pokémon will sometimes move around, making it tricky to catch them! Several factors affect your chances of catching a Pokémon. The Pokémon’s CP level, the type of Poké Ball you used, your throwing technique, and other factors come into play when determining whether the Pokémon can be successfully caught. And some Pokémon will run away!
When in this catching screen, you can activate AR to be able to move around and see where the Pokemon is in real life. Otherwise, it can be deactivated to keep the Pokemon center in the screen.
To catch a Pokémon:
1. When a wild Pokémon is nearby, your device will vibrate, and the Pokémon will appear on the map. Touch the Pokémon to begin your attempt to catch it.
2. The Pokémon will appear in front of you. You may need to orient your device or switch out of camera mode.
3. Touch and hold your Poké Ball.
4. A target ring will appear around the Pokémon. The ring’s color indicates the difficulty level of capturing the Pokémon. A green ring indicates the capture is a low difficulty, orange indicates intermediate difficulty, and red indicates extreme difficulty.
5. You have the greatest chance of capturing the Pokémon while the colored ring is at its smallest diameter. At the opportune moment, fling the Poké Ball toward the Pokémon.
6. If you are successful, the Poké Ball will capture the Pokémon. Watch out, though—Pokémon can escape from the Poké Ball.
Catching Pokemon is what the game is all about. Your Pokemon will be used to fight battles and conquer enemies in your name. Every time you catch a Pokemon you earn stardust, candy, and XP points.
When you encounter a wild Pokémon, you may have multiple attempts to capture it before it runs away. You can use items from your Bag to increase your chance of successfully catching a wild Pokémon. Razz Berries make the wild Pokémon easier to capture.
High-performance Poké Balls like Great Balls, Ultra Balls, and Master Balls increase your ability to catch wild Pokémon. Touch the Bag icon during the encounter to access these items. You can also snap photos of your Pokémon encounters using the camera.
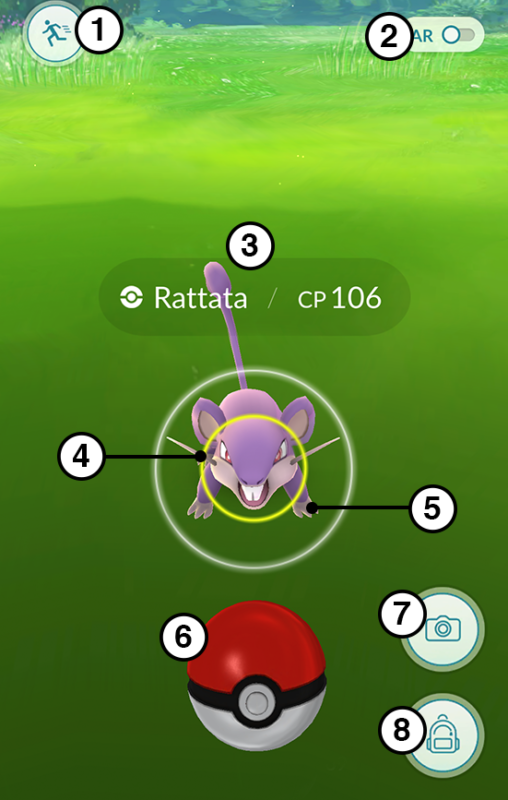
Encounter features:
1. Leave the encounter
2. Toggle AR camera mode
3. Pokémon’s name and CP
4. Target ring
5. Wild Pokémon
6. Poké Ball
7. Camera
8. Access your Bag to change Poké Balls or use a Razz Berry
As you progress in the game, you’ll encounter stronger Pokémon that require a more powerful Poké Ball (or Razz Berries, which lull the Pokémon to complacency). If the ring surrounding the Pokémon is green, you should have no problem capturing it; if it’s yellow, you have a fifty-fifty chance; when you see a red ring, you’ll need to use multiple Poké Balls, more powerful Poké Balls, or Razz Berries to have a remote chance of catching it. More than one player can catch the same Pokémon; if you and your friend see the same Pokémon on the street, you can both grab it for your separate collections.
Visit PokéStops and Gather Balls, Potions & Eggs
PokeStops are the blue towers usually found in key places within your city. Think of PokeStops as places to get free items, as that is really their main purpose. Pokéstops are important landmarks, marked on the map at significant (usually) local locations. You can obtain items, such as pokéballs, potions, revives, and eggs (which can be hatched by walking around).
You can also activate lure modules at pokéstops, which are marked by a swarm of hearts on the map, increasing the likelihood of pokémon appearing there. Some items, however, can only be purchased with pokécoins, which can be earned by fighting in gym battles or bought as in-app purchases
Now after you’ve caught a Pokemon, you’ll need some items. Look for PokéStops located at interesting places, such as public art installations, historical markers, and monuments. You can collect more Poké Balls and other items at PokéStops, which show up on your map as blue squares. When you’re close enough to a PokéStop to search it, the box on top of the blue square will open. That’s the time to gather items from the PokéStop!

On your Map View, PokéStops are represented by blue squares. When you’re close enough to a PokéStop to search it, the box on top of the blue square will open. Swipe the disc to spin it, and you’ll be rewarded with a variety of items. Items can include Poké Eggs, Poké Balls, healing potions, and more. As you increase in levels, you unlock new items to collect. After you visit a PokéStop, the blue pole will change to purple, and you’ll be unable to visit for at least 10 minutes.
Available items and your Bag
Access your Bag in the Map view by touching the Poké Ball icon. The kinds of items you’ll keep in your Bag include Poké Balls, medicines, Berries, and more. (Pokémon Eggs will not appear in your Bag.) You can also access your Bag during Pokémon encounters.
With the exception of Eggs, all items you’ve collected from leveling up and gathered from PokéStops will appear in your Bag.
The following are the Available items:
1. Poké Balls, for catching Pokémon. As you earn more XP, you’ll find more powerful Poké Balls.
2. Potions, for healing Pokémon that have taken damage.
3. As you earn XP and become a higher level Trainer, you may also find Berries, which can be used on Pokémon during encounters to make them easier to catch.

Your Bag can hold an inventory of 500 items. You will not be able to gather new items from PokéStops when your Bag is over the 500 item limit. You can lower your item inventory by discarding or using items.
Pokémon Egg
When gathering items at PokéStops, you may find Eggs that will eventually hatch into Pokémon! To hatch an Egg, you’ll need to walk around a certain distance. In general, the farther you have to walk, the rarer the Pokémon you’ll find inside when it finally hatches. Most eggs require you to walk between 2-5K before they hatch. Steps are only counted when the screen is on. An incubator can only hold one Egg at a time. To incubate and hatch multiple Eggs at the same time, you can purchase additional incubators in the shop. To hatch an Egg follow the steps below;
1. In the Map View, touch the Main Menu
2. Touch Pokémon
3. At the top of the screen, tap the word Eggs.
4. Select one of your Eggs
5. Tap Start Incubation
6. Select an incubator to use on your Egg
7. Finally, Walk to hatch the Egg. A notification will appear when the Egg has hatched.
Power Up and Evolving Pokémon
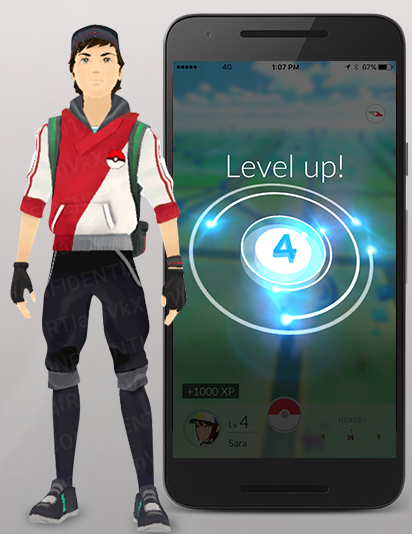
Try to catch as many Pokémon as you can to earn Experience Points (XP) and increase your Trainer level. Each capture awards XP based on the kind of Pokémon you’ve caught, whether you’ve caught the Pokémon before, and the accuracy of your throw. Once you have gathered enough of a single type of Pokémon, you’ll be able to use the Candies to evolve it.
Every Pokemon has a Combat Power (CP) number. Some will be very low, others will be high. It all depends on your XP level and the abilities of the Pokemon. You’ll need a high CP number if you want to have a chance to win gym battles. At higher levels, you’ll have access to stronger items, such as Great Balls, to give you a better shot at catching Pokémon. Keep exploring and encountering Pokémon to raise your level!
As you acquire Stardust and Candy, you’ll gain the ability to Power Up the Pokémon you’ve caught, increasing their CP and HP. You acquire Stardust and Candy by catching Pokémon, Hatching Eggs, or transferring a Pokémon to the Professor. Candy is Pokémon-specific and can be used to level up any Pokémon in that evolutionary chain.
For example, you obtain Bulbasaur Candy by catching, hatching, or transferring any Pokémon in the Bulbasaur family (Bulbasaur, Ivysaur, and Venusaur). You need Bulbasaur Candy to Power Up a Bulbasaur, Ivysaur, or Venusaur.
Stardust can be used to Power Up any Pokémon in your collection. For example, you can Power Up a Rattata using Stardust acquired by catching a Meowth. You obtain Stardust whenever you catch, hatch, or transfer Pokémon of any species. To Power Up a Pokémon follow the steps below;
1. In the Map View, tap the Main Menu.
2. Tap Pokémon
3. Select a Pokémon to Power-Up from the list of Pokémon
4. On the Pokémon summary, tap the Power Up
Please note that you won’t be able to Power Up your Pokémon until you have enough Candy and Stardust.
Another important tactic for getting powerful Pokemon is Evolving them. Evolving Pokemon changes it to a more powerful form. Most Pokemon can be evolved two times. If you catch Pokémon of the same species often enough, one of them can evolve. This is useful for catching Pokémon you’re having a tough time finding in the wild. For example, Squirtle evolves to Wartortle, Wartortle then evolves to Blastoise. To evolve a Pokemon, follow the above steps, instead of the Power Up tap Evolve button.
Earn Medals
A wide variety of challenges are available that highlight many different accomplishments, such as the number of Pokémon you’ve caught and the distance you’ve traveled. By completing these challenges, you’ll unlock achievement medals that will appear in your player profile. Try your best to unlock as many medals as you can. Touch your avatar in the lower-left corner of the Map View to see your level, and scroll down to see your achievements.

Join Gyms team and Gym Battles
After reaching level 5, you’ll be asked to join a team. Pick the same team as your friends to work together, or join different teams and play as rivals. Gyms are special points of interest found throughout the world. You can capture a Gym for your Team and battle the Pokémon of rival Teams there. Gyms can be challenged by multiple Trainers at the same time. A Gym’s level is determined by its prestige. As a Gym earns prestige, it increases in level. The higher a Gym’s level, the more Pokémon can be assigned to it, which makes it harder for rival Teams to capture. Gyms appear as towering structures in the Map View.

Once you join a team, the Professor will describe the three teams and ask you to pick one-: red (Valor), blue (Mystic) or yellow (Instinct). Each player can place only one Pokémon at a particular Gym, so you’re encouraged to work with others on the team to build up a strong defense. Remember that team members may not be your real-life friends, so be careful with what you tell them about yourself.
 There are four types of Gyms-
Neutral Gym– A neutral gym is not controlled by any team. It will be gray on the map. Anyone can claim it.
Friendly Gym– A friendly gym is any gym controlled by your team. At these gyms, you can practice battle amongst teammates to raise the gym’s level.
Enemy Gym– As you may have guessed, an enemy gym is controlled by other teams. In these battles, you can use up to six Pokemon to go up against the other team. Every time you defeat the enemies it knocks the gym down one level.
Defending a Gym– If you’re lucky enough to defeat an enemy and claim a gym as your own, there are a few things to know. The Pokemon you choose to defend the gym will be unavailable to you until it’s defeated. You’ll know when your Pokemon has been defeated when it’s back in your list of Pokemon and has only 1 HP.
Attacking Gyms
You can use your own Pokémon to challenge Gyms claimed by other teams. With the Pokémon you’ve caught, engage in battle against the Defending Pokémon at the Gym to claim control. If the Gym’s Prestige is reduced to zero, the defending team loses control of the Gym, and you or another player can then take control of it by assigning a Pokémon to protect it. When you occupy a gym, you not only help your team — but you earn PokéCoins, too. Every 20 hours, you can visit the Shop and redeem your coins, based on how many gyms you currently occupy. To battle Pokémon at rival Gyms follow the steps-by-steps instructions from below;
1. Walk up to a Gym controlled by an opposing team.
2. Tap the Gym to enter it.
3. Select up to six Pokémon to use in battle. There are two ways of making your selections.
Tap the icon of an individual Pokémon to swap it out for a different Pokémon.
Tap the Shuffle to get a completely different set of six Pokémon to use in battle.
4. To start the battle, tap the Glove.
During the battle, you can perform one of three different actions:
Fast Attack
1. For fast attack, Tap your Pokémon to perform a fast attack
3. Fast attacks charge your special attack meter.
Dodge attacks
For Dodge attacks Swipe left or right to dodge attacks.
Special Attack
Once your Special Attack meter is charged, long-press your Pokémon to perform a special attack. Special Attacks cause large amounts of damage.
Revive Fainted Pokémon
To revives a Pokémon that has fainted in battle, you can revive or heal Pokémon using Potion. To use a Potion to revive Pokémon follow the steps below;
1. From the Map View, tap the Main Menu.
2. Tap Items
3. Select a Potion from your Bag of items, and then select the Pokémon to be healed. You can use Revives and Max Revive to revive Pokémon that have fainted.
Pokémon GO Plus
If you want to play the game without having to take your phone out of your pocket. You can invest in the $30 Pokémon Go Plus wearable. The device connects to a smartphone via Bluetooth low energy and notifies you about events in the game—such as the appearance of a Pokémon nearby—using an LED and vibration.
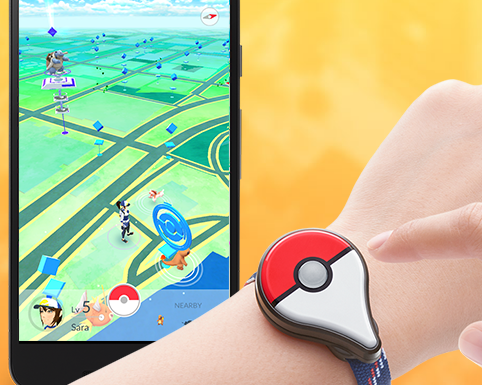
The Pokémon GO Plus will begin to blink and vibrate whenever you’re within range of a PokéStop. Press the Pokémon GO Plus button to search the PokéStop for items. If you find any items, swipe or tap them to add them to your inventory. To activate a PokéStop or catch a Pokémon, you will press the wearable device in a specific pattern.
In-App Purchases
If you want to enhance your Pokémon GO experience, even more, certain items and features can be accessed via in-app purchases.
You can spend real money on PokéCoins, the in-game currency of Pokémon GO. PokéCoins can then be exchanged for power-ups, extra items, and other enhancements. You can buy 100 Pokecoins for $0.99, 550 for $4.99, 1,200 for $9.99, 2,500 for $19.99, 5,200 for $39.99 or 14,500 for $99.99.
That concludes our guide on How To Play Pokémon Go and become a Pokémon master. Watch out for more guides on Pokémon Go.
Related Pokémon GO Post: How To Join Gym in Pokemon Go and become the Gym Leader
This post was originally published on July 14, 2016, updated on November 07, 2018.


Learning to play
Pingback: How To Join Gym in Pokemon Go and become the Gym Leader
It consumes battery like hell
Pingback: How to Sign Up for Pokémon Go or Login Pokémon Go
Have you heard any more news on the canadian release?
Never ending stories on Pokémon Go.
The world is captivated by Pokémon Go
A dangerous game!! Trust me
The game is not dangerous, it is those players acting fools.
Good information
Pingback: How to Fix Pokemon Go Crashes on Android and iPhone
Pingback: Pokemon GO APK Download for Android & iPhone (all Countries)
Indeed, A Complete Beginner’s Guide on Pokemon Go
Pingback: How to Fix Pokémon Duel Crashes on Android and iPhone (Solutions)
Pingback: Pokemon Go Maps - List of Maps to Locate and Catch Pokemon