Looking for a solution to recover deleted files on Android or lost data or images and videos that are lost due to some error? You are here at the right web page. Do you ever feel dependent on your smartphone? If so, you’re by no means alone. Smartphone has swept the whole world recently for its powerful features and a stylish appearance and is fast becoming an integral part of everyday life.
With instant access to text messages, emails, social media, games and practically everything else we could want, our obsession with smartphones is starting to resemble an addiction. We use our phones when we are walking, driving, hanging out with friends, waiting for a bus, standing in line, and even in bed. Without our smartphones life is becoming unthinkable.
These devices store a vast amount of important data we cannot live without, too, photographs, bookmarks, songs, videos, applications, and much more. No doubt, the more we use these devices, the more valuable data are stored in the device. And some of them are significant for the users, and we never expected to lose them. However, for a variety of reasons, still, we often lose data on a smartphone’s internal memory including contacts, messages, call history.etc.
There are many reasons that would lead to data loss like pulling out memory cards without properly shutting down the phone, accidental deletion, formatting, mistaken partitions of data and many more. In addition, various accidents would happen like virus attacks, system failure which can result in loss of information.
We’ve all done it or experience at some point, right? Don’t panic, though. There are ways to recover deleted files on Android or data whether you are using rooted or non-rooted devices. The good news is you have several different options available to help you restore all or part of your precious files. This guide explores different ways to recover deleted files such as SMS messages, contacts, photos, videos, etc. from your Android devices.

First Tips:
Well … the first thing is to always back up anything that’s important. There are at least a few dozen free cloud accounts you can get by googling free cloud account. The easiest way to back up your files is to sync your phone with your Google account. Google can save contacts, calendars and other information to the cloud which you can access through your Gmail account. All you have to do is Go to Settings>System Backup or Backup & Reset. Of course, you need to enable internet access or the phone in order to sync automatically. You can also look for free cloud storage accounts and back up your data there. So from now on, make sure you always back up at least the important things as soon as possible.
Read: Unfortunately Google Play Store has stopped working – How to solve it
How to Recover Deleted Files from Android and iOS Phones
There are hundreds of tools for recovering deleted files or lost data available online, we recommend you to use only trusted tools, some of the tools we have mentioned below are tested and working on both Android (rooted and non-rooted) and iOS devices. Please be aware that we are not affiliated with these tools or software.
First Step
Before you try to recover deleted files or data using recovery tools, you will first need to enable USB debugging on your smartphone. You could do this by just following a short instruction below;
1. Navigate to Settings, About phone and tap the build number 5 times.
2. Navigate to Settings, Developer options, USB Debugging, and tap Enable.
Once you have USB debugged enabled, you can try to recover the lost data on your Android Smartphone using any one of the following tools.
Step Two
Some of the tools we have mentioned below are some of the best options for data recovery tools or software available on the current market. It helps you recover deleted files- lost messages, contacts, photos, videos, documents and more back to your phone. It can recover your deleted/lost contacts, messages, call logs, media files and documents from your device, backing up the current data of your device to your computer.
Recovering Deleted Files or Data using Wondershare Dr. Fone – Data Recovery
First, go to the official Dr. Fone Website and download and install Android Data Recovery on your computer.
For Android Data Recovery (Non-Rooted)
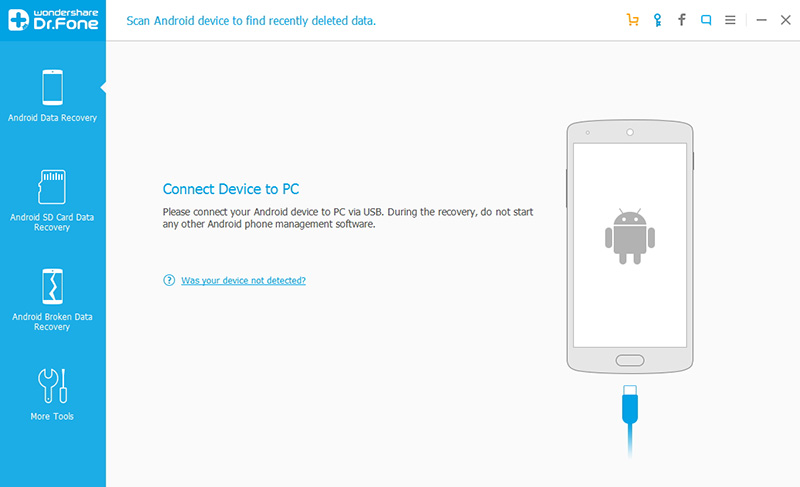
1. Connect your Android device
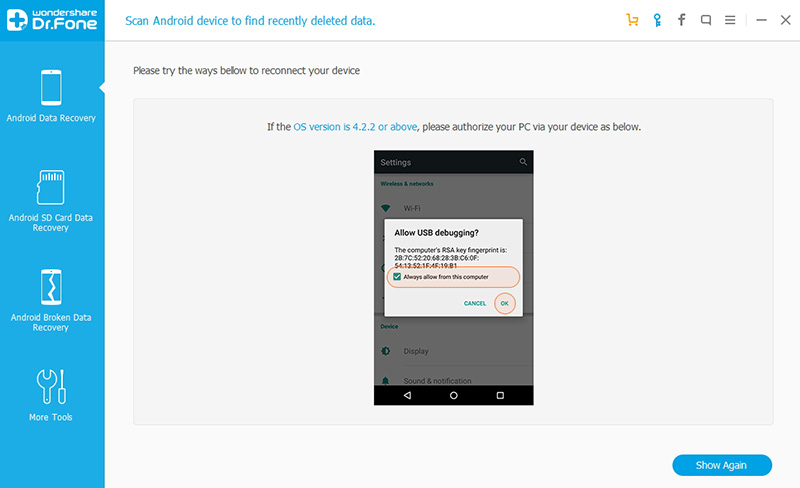
Launch Wondershare Dr.Fone on your computer and use a USB cable to connect your Android device with your computer. Please make sure you enable the USB debugging on your device before, you will get a pop-up message on your device and need to enable it now. If you’ve done it already, just skip this step and proceed to the next step.
2. Select the type of file to scan
Once your device is detected by the tool, you can check the type of data or files that you’d like to recover. And then click “Next” to continue the data recovery process.
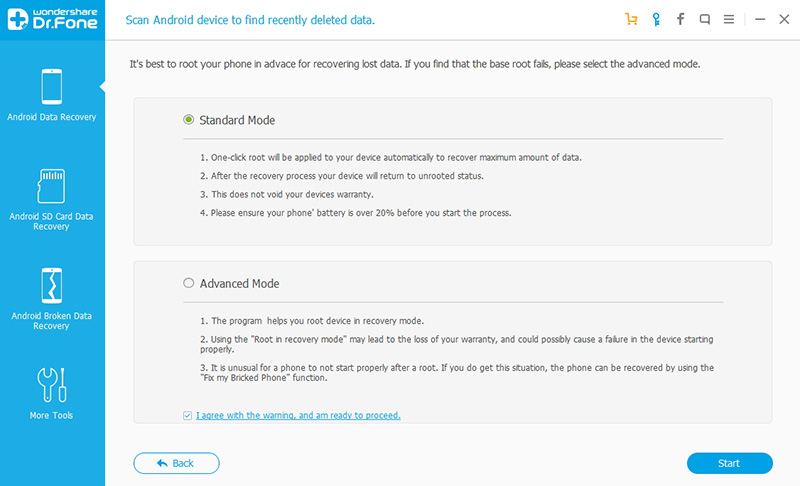
3. Scan your device for lost data on it
Now, click “Start” to begin analyzing and scanning your device, follow the onscreen instructions.
You can read the description and choose the “Standard Mode” or the “Advanced Mode” here to continue according to your needs. We recommend you to try the “Standard Mode” first, which works faster. If it doesn’t work, you can try the “Advanced Mode” later. Now, Dr.Fone will start scanning your device to recover deleted files. Be patient, this process might take a few minutes or more.
4. Preview and recover deleted data on Android devices
When the scanning is completed, you can preview the found data one by one. Check the items you want to recover and click “Recover” to save them all on your computer.
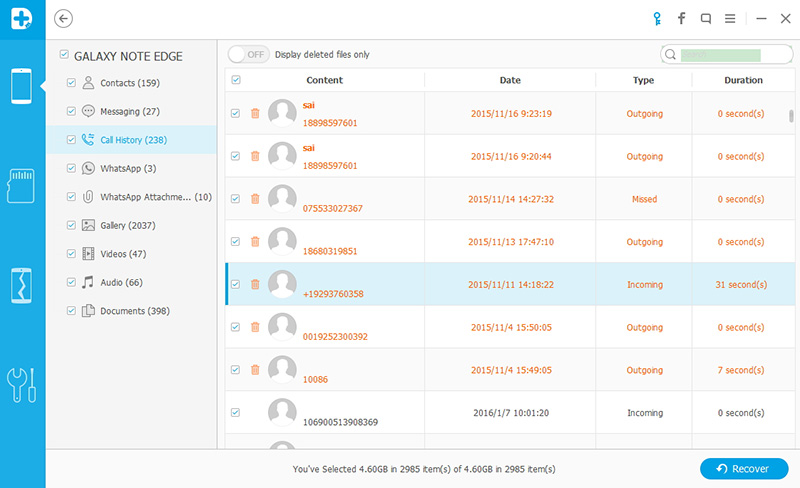
Please note that this Android data recovery software scans both deleted and existing data on your Android device. You can turn on the button of “Display deleted files only” to separate them if you have a need. Also, you can use the search function on the top right to search what you need in the scan results.
If you want to recover data from your micro SD, you just insert your micro card via your Android device or a card reader, put in a scan mode to SD card and repeat the process as above.
Recover Deleted Files or Lost Data on iOS
First Download Wondershare Dr. Fone and install it on your computer.
1. Connect iOS Device with Computer
Download Dr.Fone iOS Data recovery from the above link. Install and launch Dr.Fone on your computer. Use the USB cable that comes along with your iOS device to connect your iPhone, iPad or iPod touch, to your computer. By default, Dr.Fone will detect your iOS device automatically and show you the window for “Recover from iOS Device”. Make sure that before running Dr.Fone, you download the latest version of iTunes.
To avoid automatically sync, don’t launch iTunes when running Dr.Fone. We suggest you disable the automatic syncing in iTunes beforehand. To do this launch iTunes > Preferences > Devices, check “Prevent iPods, iPhones, and iPads from syncing automatically”.
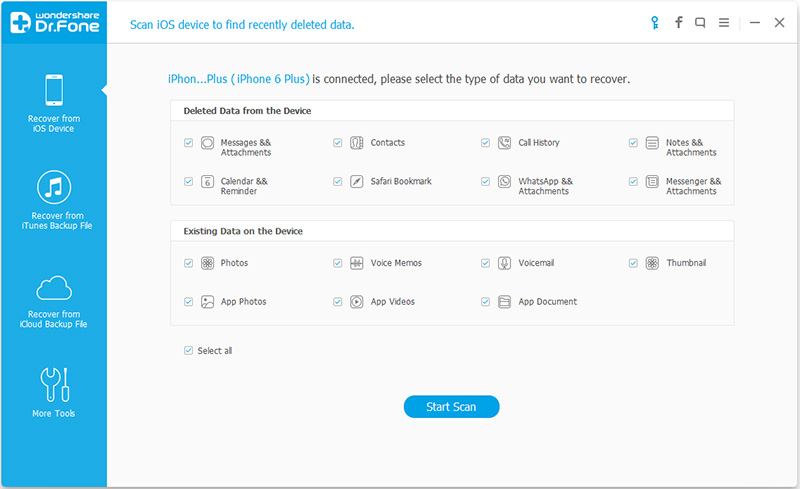
2. Scan Your Device for Lost Data
Simply click on the “Start Scan” button to let this program scan your iPhone, iPad or iPod touch to scan for deleted or lost data. Be patient, the scanning process may last for a few minutes, depending on the amount of data you have on your device.
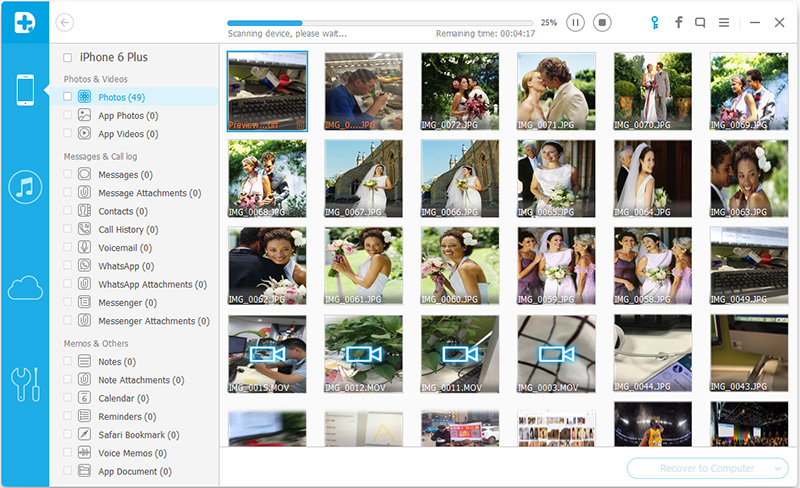
3. Preview the Scanned Data
Once the scanning is completed, you can see a scan result generated by the program. Data both lost and existing on your device will be displayed in categories. To filter out the deleted data on your iOS device, you can swipe the option “Only display the deleted items” to ON. By clicking the file type on the left side, you can preview the found data. And you can see there is a search box on the top right of the window. You can search for a specific file by typing a keyword in the search box.
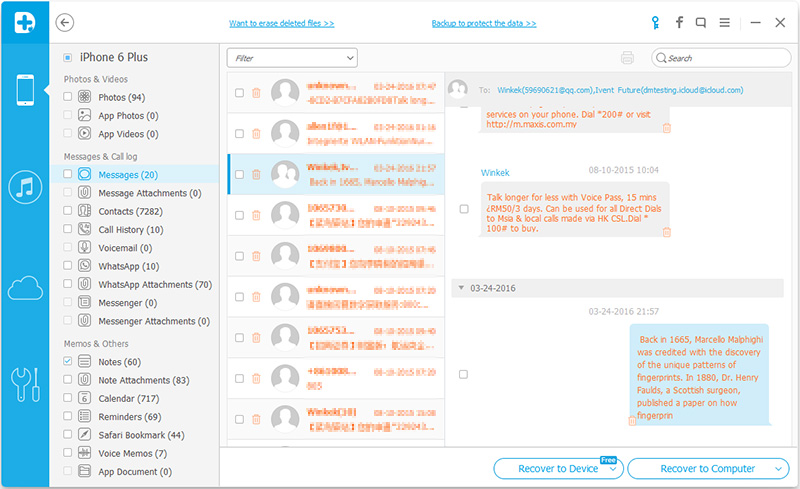
4. Recover Data from Your iPhone/iPad/iPod touch
When you find the data you want to recover, just checkmark in front of the box to select them. Then, click the “Recover” button at the bottom right of the window. By default, the recovered data will be saved to your computer. As for text messages, iMessage, contacts, or notes, when you click Recover, a pop-up will ask you to “Recover to Computer” or “Recover to Device”. If you want to put these messages back to your iOS device, click “Recover to Device”.
Recovering data from Memory Card
If the files or data you are looking for were on your memory card, you can use Recuva by using Micro SD Card Adapter to attach your microSD via USB. Recuva has the special ability to scours your media (except CDs, DVDs, and other optical media) and puts together the pieces so you can recover the files you need. First, download and install Recuva.
To recover deleted files or date from your SD card using Recuva follow the step-by-step instructions;
1. Once installed Recuva on your Computer, run Recuva in a Wizard mode. If the Wizard doesn’t appear, click the Options button, and then click Run Wizard.
2. On the Welcome screen to the Recuva Wizard page, click Next.
3. On the File Type page, select the type of files you want to recover, then click Next. If you’re not sure what type of files you’re looking for then select Other.
4. On the File Location page, select the location where you want to search, and then click Next.
5. On the Thank You page, click Start. Recuva will display the progress of the scan, this might take few minutes or more depending on the size of files on your card. Once it finishes scanning, it will show the search results in the main window.
6. Select the checkboxes beside the file or files you want to restore. The color of the dot next to the file name indicates your chances for a successful recovery (green for excellent, orange for acceptable, and red for unlikely)
7. Once located your file, click on Recover. Select a destination for the recovered files (ideally, on another drive). Click OK.
If the files you are looking for are not in the list close Recuva and repeat Steps 1 to 4 again. On the Thank You page, select Enable Deep Scan and then click Start. This advanced scan will take much longer possibly hours.
FonePaw Data Recovery
FonePaw Data Recovery is an effective piece of software that can detect and recover deleted files or lost data from Android and iOS devices, all within a user-friendly interface that’s trouble-free and pleasing to navigate. Coupled with its powerful data recovery capacity and multiple OS version and devices compatibilities.
Recover Deleted Data on Android using FonePaw
1. First, download and install FonePaw.
2. Connect your Android device
Once installed launch FonePaw Android Data Recovery and connect your Android device to your computer using a USB cable. Wait for a few seconds before the device is detected.
3. Once detected click on OK
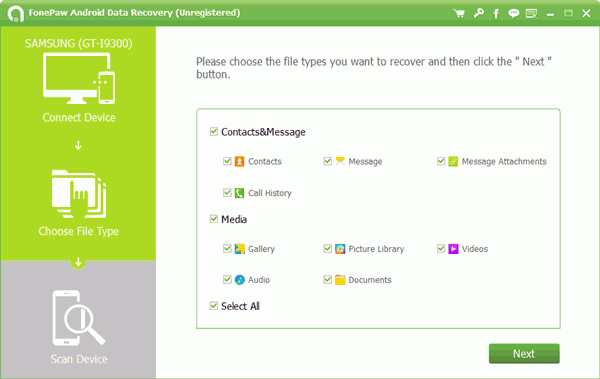
4. Select the types of data to scan
Before scanning, please make sure that the battery of your device is more than 20%. After the Android phone being detected by the program successfully, click the file types you want to recover and click “Next” to begin scanning.
5. Choose files to recover
The scanning will take you a while depending on the size of the date and after that, the files under types you chose will be listed in detail. While previewing these files, you can mark down the files you need and click “Recover” button to retrieve them from your Android device to the computer.
Recover deleted data from iPhone/iPad/iPod touch
1. First, download and install FonePaw iPhone Data Recovery.
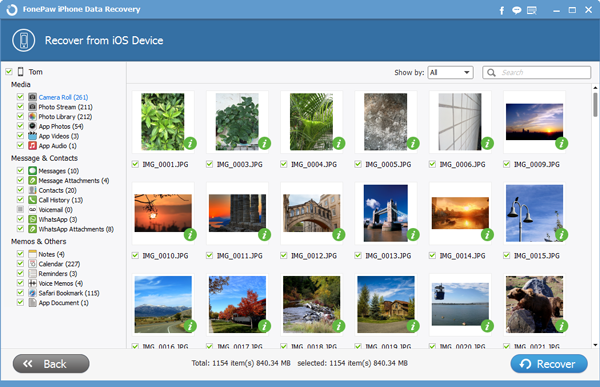
2. Once installed, launch iPhone Data Recovery and Connect iDevice to your computer. Plug iOS device into a computer via USB cable. Then choose “Recover from iOS Device” and click “Start Scan”.
3. Scan, Preview and Recover Data from iDevice
When the scanning is completed, you will see all the found data are listed on the left side of the interface. You can preview all the files one after another. Then select those data you want to recover and click “Recover” to save them on to your computer.
Recover Deleted Files on Android with Undeleter (ROOT)
Undeleter is another great tool to recover deleted files from internal storage, SD card. It can recover documents, pictures, videos, music, archives, ebooks and binaries. It will restore all supported image file types and all types of data, including SMS, call logs and WhatsApp or Viber conversations. See the below the instructions on how to use this;
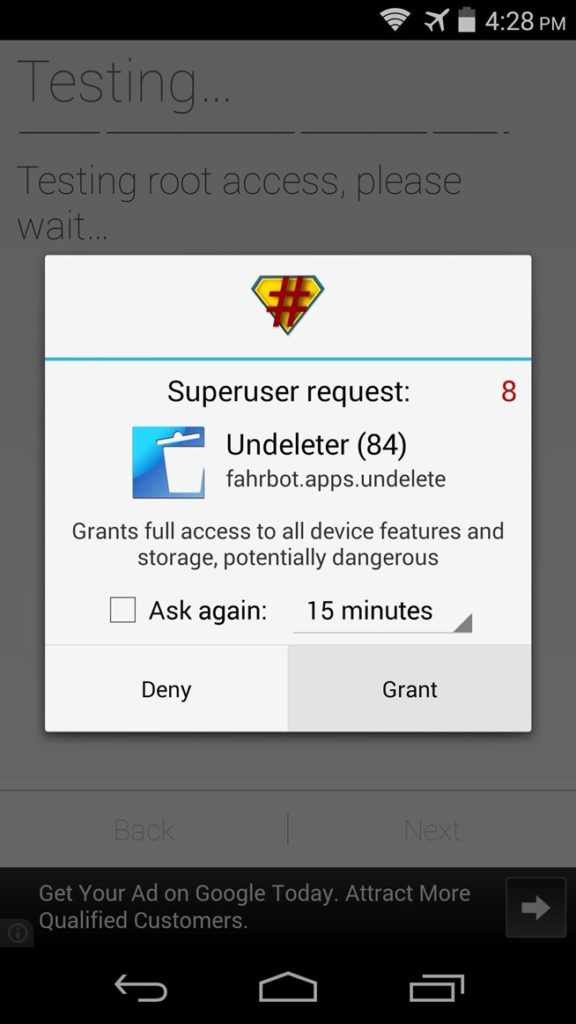
1. Download and Install Undeleter Recover Files & Data
2. Launch the app, tap Next, then the app will ask for Superuser privileges, so hit Grant.
3. Again tab on Next again, then select the storage volume where your file was originally saved. Tap Show More for more storage location options.
4. Once the scanning is completed, all deleted files will be displayed. To refine your search, you can swipe between the tabs, and these results will be categorized by file type.
5. Once located, Tap on the file that you are trying to recover, then a full-screen ad will appear. Close by tapping the Back button on your device.
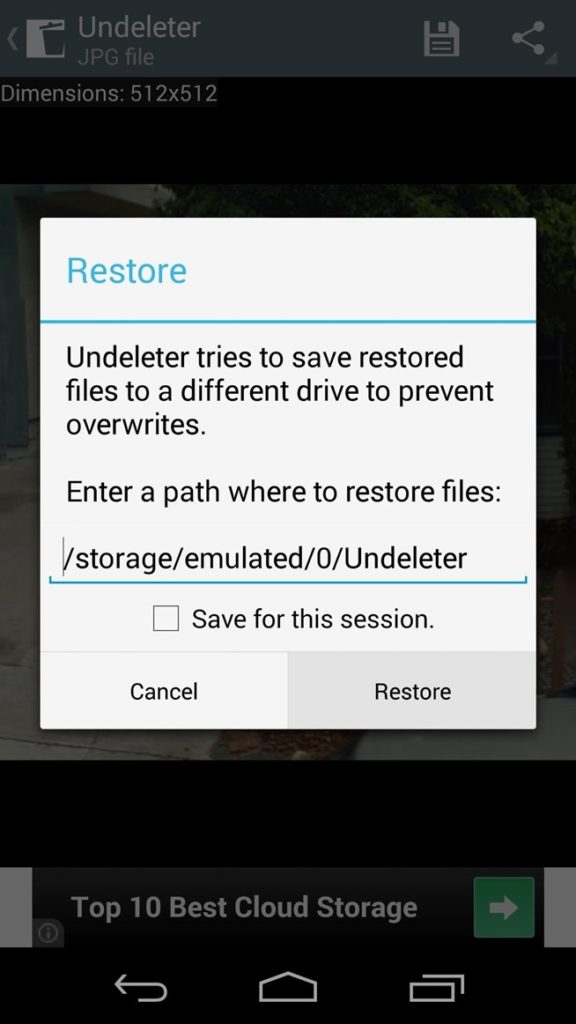
6. On the next screen, tap the Save icon at the top of the screen to begin restoring the file.
Recover Deleted Files With DiskDigger
DiskDigger is another handy tool to recover deleted files like lost photos and images from your memory card or internal memory. With this tool no rooting necessary. Whether you accidentally deleted a photo or even reformatted your memory card, DiskDigger’s powerful data recovery features can find your lost pictures and let you restore them. If your device is not rooted, DiskDigger will perform a “limited” scan if it is rooted, the app will search all of your device’s memory for any trace of photos, as well as videos.
1. First, download and install DiskDigger.
2. After launching the app, it will display two options: “Basic scan” and “Full Scan.” The “full” scan functionality is available only on rooted devices, whereas the “basic” functionality is available regardless of whether your device is rooted.
3. Once scanning starts wait for a while, you will see the main DiskDigger screen, which will start populating with recoverable files.
4. You may tap on any of the files to select its checkbox, which will select it for recovery. You may also tap on the overflow menu (three dots) on each of the files, to see recovery options for each individual file.
5. Pressing the “Options” button (gear icon) will allow you to filter the recoverable files based on file size and file type.

6. DiskDigger provides three different ways for you to save the recoverable files: Save to an app, Save to device, and FTP upload. To recover one or more files, tap the checkmark next to the recoverable files you want to recover, then tap the “Recover” button in the top toolbar.
Recover Deleted Photos from Android
This android application will help you to restore all deleted photos from your memory card or internal memory it is similar to diskdigger photo recovery and does not require root. Download Recover Deleted Photos from Google Play Store and give it a try.
I hope these tools help you restore or recover deleted files from your phone. So from now on, always make sure you back up at least the really important things as soon as possible.
Last Updated on May 04, 2019.
You might also like:
20 Best Photo Editing Apps for Android
The 20 Best Wallpaper Apps for Your Phone
How to Recover Deleted Photos on Android and iOS
How to Delete Snapchat Account Permanently in Two Easy Steps?
How to Find out Someone on Tinder? Check if your Partner is on Tinder
How To Backup, Restore, Recover Deleted WhatsApp Messages: A Guide
How to Delete Instagram Account Permanently or Temporarily ~ A Guide
How to Delete Telegram Account ~ A Complete Guide


Pingback: How to recover deleted photos on Android and iOS
Pingback: How To Backup and Restore WhatsApp Messages ~ A Complete Guide
Pingback: Unfortunately Google Play Store has stopped working - Solved